Who’s ready for a big ol’ slice of cake?! Whether you’re celebrating a birthday or any special occasion, cake is always a must! I’m a big fan of cake and wouldn’t be against eating Sprinkles the funfetti cake slice!

This sweet slice, of course named Sprinkles, is so easy to whip up and you could even make a handful to create a full amigurumi cake. The perfect play food for any little kitchen or tea set. This slice is so easy to customize so if you love other flavors of crochet cake, totally make that! I can see this one being a red velvet or even a chocolate fudge! The options are unlimited for sprinkles the funfetti cake slice!
I hope you enjoy making Sprinkles the Funfetti Cake Slice!
CLICK TO PIN THIS POST NOW!
Here’s what you’ll need:
*Note – This is a worsted weight acrylic, category 4 yarn. Any worsted weight yarn will work but please be aware that your project size may turn out differently.
- Hobby Lobby’s Print I love this yarn in the color “Drizzle Me This” & Hobby Lobby’s I love this yarn in the color “Ivory”
- Crochet Hooks- Sizes F/3.75mm and G/4.0mm (These are the hooks I LOVE!)
- 1 Pair of 9mm black safety eyes
- Black and pink embroidery floss
- Embroidery needle
- Bugle beads- size 5mm (These are the beads I used)
- Sewing needle and white thread (for attaching the beads)
- Fiberfill
- Stitch Markers
- Straight Pins
- Yarn needle
- Scissors
- Thin cardboard and tape
- Hot glue gun
Abbreviations:
Crochet pattern is written using U.S. crochet terminology.
Crochet technique video & photo tutorials can be found here.
R- Row
Ch- Chain
Sc- Single Crochet
Inc- Increase (This means place two single crochet into one stitch)
FLO- Front Loops Only
St/s- Stitch/es
* – Repeat the directions in between * and * as many times as stated.
( ) – The number inside will indicate how many stitches you should have at
the end of each round.
Finished Measurements:
4.25 inches long, 4 inches wide and 3 inches tall.
Pattern Notes:
- The Ch 1 at the end of each row does not count as a stitch.
- Use a Size F/3.75mm hook for all the cake pieces.
- Use a Size G/4.0mm hook for the bobble icing.
Prefer an ad-free, printable PDF pattern?
Grab Sprinkles the Funfetti Cake Slice Crochet Pattern HERE
Side Piece
Using Drizzle Me This Yarn, Ch 12.
R1: Starting in 2nd ch from hook, sc across. (11 sts) Ch 1 and turn.
R2-19: Sc 11. Ch 1 and turn after each row.
Add safety eyes, placing the 1st eye between rows 8&9 and the second eye between rows 13&14. Place the eyes about 4-5 stitches up from the edge.
Sew on mouth.

For the cheeks, use pink embroidery floss (or felt) and make 8 sc into a magic ring. Fasten off and attach to the cake.
R20: In FLO, Sc 11. Ch 1 and turn.
R21-38: Sc 11. Ch 1 and turn. Do not ch 1 and turn after row 38.
Fasten off and weave in ends.

Bottom Piece
Using Drizzle Me This Yarn, Ch 2.
R1: In the 2nd ch from hook, inc. (2 sts) Ch 1 and turn.
R2: Inc in each st. (4 sts) Ch 1 and turn.
R3: Sc 4. Ch 1 and turn.
R4: Inc, sc 2, inc. (6 sts) Ch 1 and turn.
R5: Sc 6. Ch 1 and turn.
R6: Inc, sc 4, inc. (8 sts) Ch 1 and turn.
R7: Sc 8. Ch 1 and turn.
R8: Inc, sc 6, inc. (10 sts) Ch 1 and turn.
R9+10: Sc 10. Ch 1 and turn.
R11: Inc, sc 8, inc. (12 sts) Ch 1 and turn.
R12+13: Sc 12. Ch 1 and turn.
R14: Inc, sc 10, inc. (14 sts) Ch 1 and turn.
R15+16: Sc 14. Ch 1 and turn.
R17: Inc, sc 12, inc. (16 sts) Ch 1 and turn.
R18: Sc 16.
Fasten off and leave a long tail for sewing.

Top Piece
Using Ivory Yarn, Ch 2.
R1: In the 2nd ch from hook, inc. (2 sts) Ch 1 and turn.
R2: Inc in each st. (4 sts) Ch 1 and turn.
R3: Sc 4. Ch 1 and turn.
R4: Inc, sc 2, inc. (6 sts) Ch 1 and turn.
R5: Sc 6. Ch 1 and turn.
R6: Inc, sc 4, inc. (8 sts) Ch 1 and turn.
R7: Sc 8. Ch 1 and turn.
R8: Inc, sc 6, inc. (10 sts) Ch 1 and turn.
R9+10: Sc 10. Ch 1 and turn.
R11: Inc, sc 8, inc. (12 sts) Ch 1 and turn.
R12+13: Sc 12. Ch 1 and turn.
R14: Inc, sc 10, inc. (14 sts) Ch 1 and turn.
R15+16: Sc 14. Ch 1 and turn.
R17: Inc, sc 12, inc. (16 sts) Ch 1 and turn.
R18: Sc 16. Ch 1 and turn.
R19: In FLO, Sc 16. Ch 1 and turn.
R20-30: Sc 16. Ch 1 and turn. Do not ch 1 and turn after row 30.

Fasten off and leave an extra long tail for sewing.
With the bugle beads, sew all over the top of the crochet cake. Make sure to leave about 2 rows of the cake bare as this will be covered by the bobble icing later.
Bobble Icing – Make 2
(Use a Size G/4.0mm crochet hook!)
Note- For this entire row, go through both loops, leaving the back “bump.”
Using Ivory yarn,
Ch 18. *Yarn over and insert hook into the 2nd chain from the hook. Yarn over and pull through chain. Yarn over again and pull through 2 loops. 2 loops will remain on your hook. Repeat until you have 5 loops on your hook. Yarn over for a final time and pull through all 5 loops. This will create the first bobble. Then sc in the next 2 chain spaces, making sure to go through both loops, leaving the back bump.* Repeat from * to * until you have 2 chain spaces left. In one chain space, make one more bobble. Sc in the last stitch. (6 total bobbles) Fasten off and leave a tail for securing to cake.
Assembly
To make the cake slice more structured, I added a cardboard triangle wedge to the inside. Grab a thin cardboard box (think cereal or cracker boxes!) and trace each crocheted cake piece. Cut out, making sure the cardboard piece is slightly smaller than the crocheted piece.

Prefer an ad-free, printable PDF pattern?
Grab Sprinkles the Funfetti Cake Slice Crochet Pattern HERE
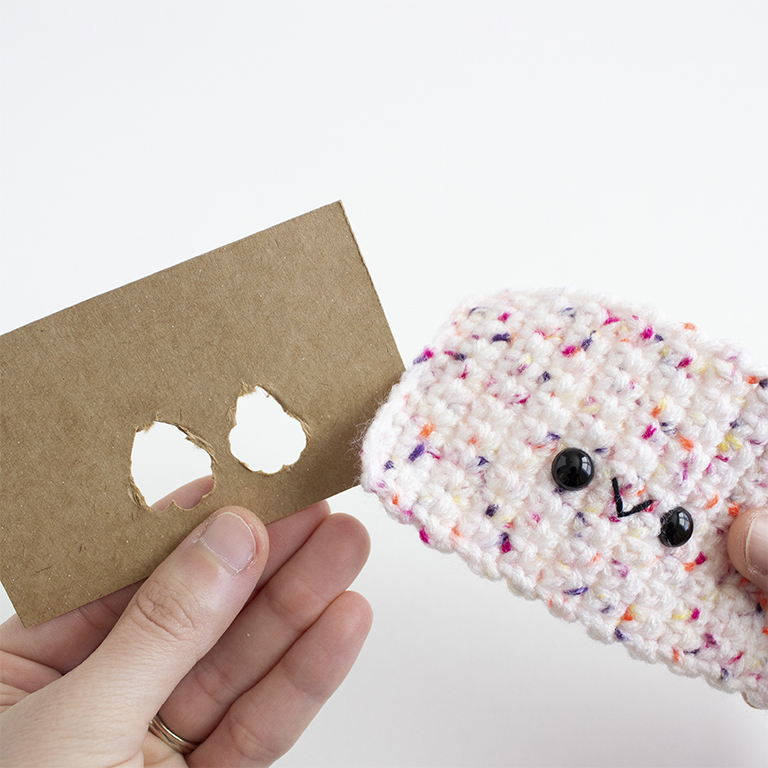
For the crochet cake piece with the safety eyes, you’ll need to poke holes in the cardboard that line up with where the safety eyes are. I use a hole punch first and then use scissors if needed.
With tape, connect all the pieces. First take the side pieces and tape in the center and then tape the top and bottom pieces to it.
For the back panel, tape to the top piece of cardboard, add fiberfill and then tape to the bottom piece of cardboard.

Sewing the pieces together
Start with the bottom and side crochet pieces. Line up the edge and using the long tail left over from the bottom piece, whip stitch to sew them together. Then line up the next side and sew together.

Next, line up the top crochet piece to the side piece and using the extra long tail left over from the top piece, whip stitch to sew them together. You’ll start in the bottom right corner.
Go along the edge until you reach the top, then sew the top and side crochet piece together.
Once you get to the very center tip of the cake, insert the cardboard box. Make sure to get the holes to line up with the safety eyes.
Prefer an ad-free, printable PDF pattern?
Grab Sprinkles the Funfetti Cake Slice Crochet Pattern HERE

Continue to sew the pieces together until you reach the end. Secure the tail with a knot and hide inside the cake.

Finally, with a hot glue gun and the bobble icing pieces, attach one piece to the top of the amigurumi cake, where those two rows have no beads.
Then attach the other piece to the bottom of the cake. Secure the left over tails inside the cake.

And there you have it! Your very own Sprinkles the funfetti cake slice! I hope you’ve enjoyed this free crochet cake slice pattern! I can’t wait to see what flavors you all whip up!

➤Make sure to check out all of my other free crochet patterns here!
If you have any trouble with this amigurumi crochet pattern, please don’t hesitate to reach out!
Be sure to tag me on Instagram @amenagerieofstitches and use the hashtag #amenagerieofstitches, if you decide to make some of these! Click here to check out more free patterns!
This crochet pattern is an original pattern by Lauren Espy of A Menagerie of Stitches. Please do not claim this pattern as your own. If you’d like to share this amigurumi pattern, you may provide a link to this post but please do not reprint it on your website.
You may sell products made from this crochet pattern but please credit me, Lauren Espy of A Menagerie of Stitches, and provide a link to my blog www.amenagerieofstitchesblog.com Absolutely no mass production or manufacturing of any kind is allowed. Thank you for understanding. I hope you loved this Free Crochet Pattern – Amigurumi Sprinkles the Funfetti Cake Slice.
Disclaimer- This crochet post contains affiliate links. By clicking these links, you help support me and my business at no cost to you. All opinions are my own.
Happy Crocheting!
-Lauren


