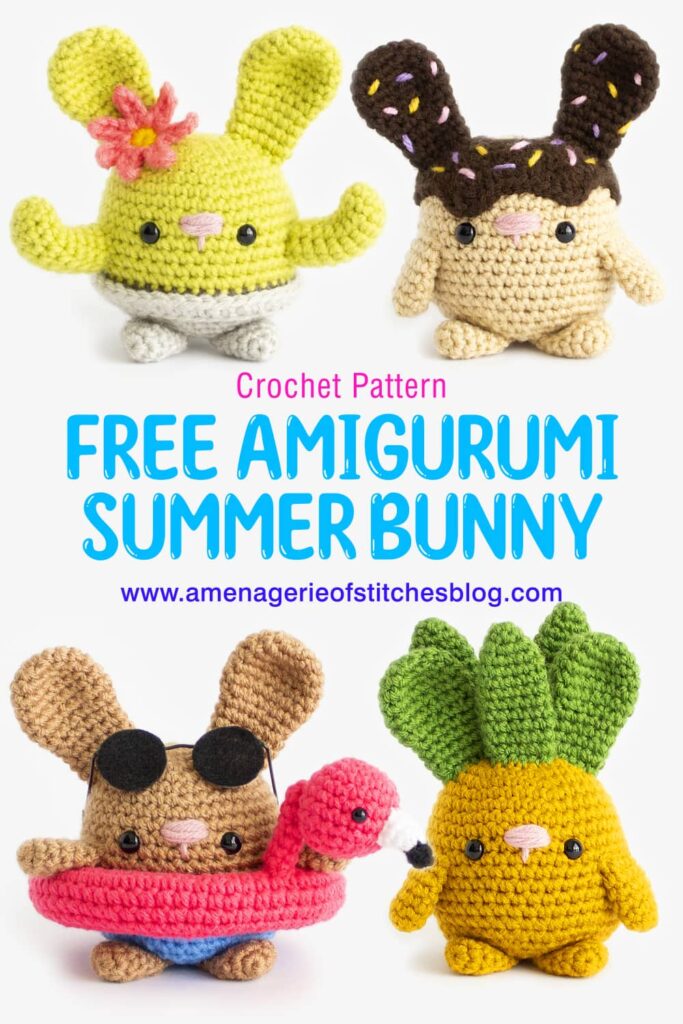
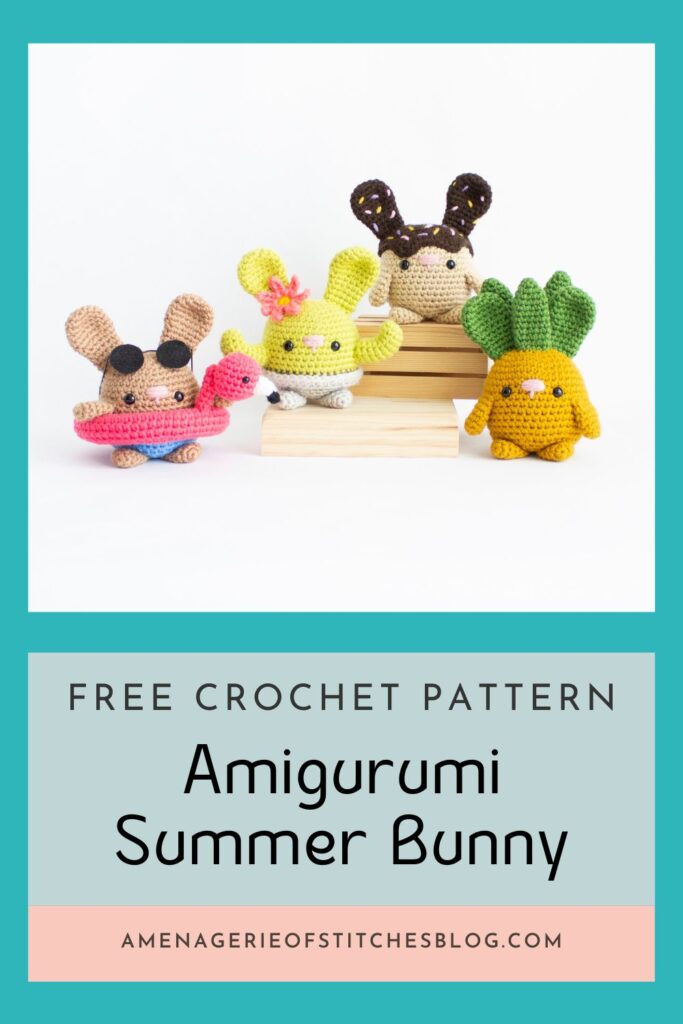
Our crochet summer bunnies are starting to arrive, and I’m thrilled to introduce this new collection to all of you! Because the first day of Summer is in June, I decided to make a collection that really encompasses this time of year. We have a great mix of different characters to celebrate with this month but they’re also great any time of year!
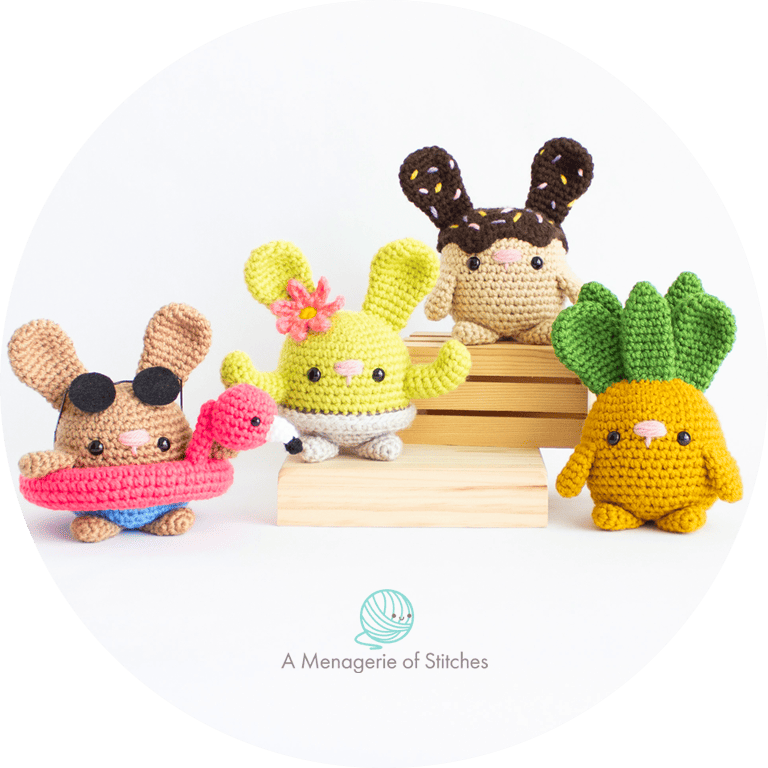
We’re starting things off with a sprinkled donut bunny because on June 2nd it’s National Donut day! Next we have a saguaro cactus that is getting ready to grow! This wouldn’t be a Summer collection without something tropical so a pineapple bunny was a must! Let’s spend the day at the beach with our final bunny- a beach bunny and his flamingo pool floaty!
The base for the crochet summer bunnies is the same as the one that can be FOUND HERE. This post is only sharing the modifications needed to make each character. You will need to reference back to the original Chubby Bunny Crochet Pattern when crocheting each piece. Under each character I have listed the specific materials needed to complete each design.
This collection is very summer-y and I hope you enjoy making one, two or even all four of them!
I hope you have fun making these Summer Bunnies!
Let’s get crocheting!
CLICK TO PIN THIS POST NOW!
Abbreviations and Terms Used:
Crochet pattern is written using U.S. crochet terminology.
Crochet technique video & photo tutorials can be found here.
R- Round/Row
Mr- Magic Ring
Sc- Single Crochet
Inc- Increase
Inv Dec- Invisible Decrease
Dec- Decrease
FLO- Front Loops Only
BLO- Back Loops Only
Hdc- Half Double Crochet
Dc- Double Crochet
Tr- Treble Crochet
Ch- Chain
Sl St- Slip Stitch
Sk- Skip
St/s- Stitch/es
* – Repeat the directions in between * and * as many times as stated.
( ) – The number inside will indicate how many stitches you should have at the end of each round.
Pattern Notes:
- Below is a full how to video tutorial for the original amigurumi chubby bunny from my Youtube channel, A Menagerie of Stitches. Please consider subscribing! 🙂
- When the number comes AFTER the stitch, such as Sc 2, this means to place one single crochet into the next two stitches.
- When the number comes BEFORE the stitch, such as 2 sc, this means to place two single crochet stitches into the same stitch.
- If there are two stitches listed in between commas, such as “Sc, hdc dc, sc”, this means to place both a hdc and dc together in one stitch.
Prefer an ad-free, printable PDF pattern?
Grab the Seasonal Bundle of Chubby Bunny Crochet Patterns HERE
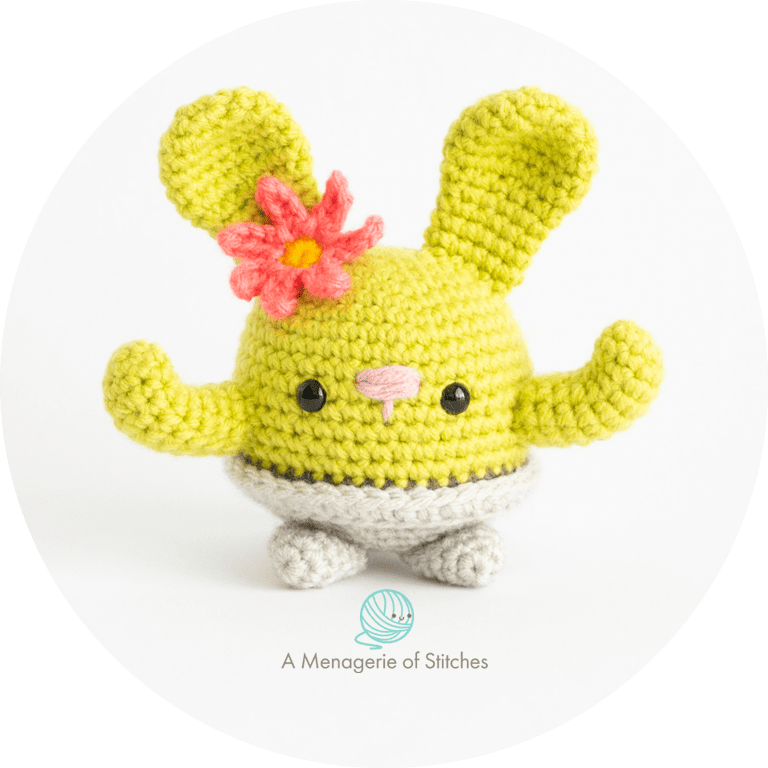
Saguaro Cactus Bunny
Materials Needed:
- Yarn- I used Michaels Loops & Threads Impeccable in the colors Grass, Walnut Tweed, Coral, Sunny Day, Putty, and Soft Rose
- Size E/3.5mm Crochet Hook
- 1 pair of black 9mm safety eyes
- Optional- Hot glue gun
- Plus all other materials listed in the original pattern
Ears- Follow the pattern and make 2 ears in Grass.
Arms and Legs- Follow the pattern and make 2 legs in Putty. For the arms, follow the pattern listed below.
Tail- Follow the pattern and make the tail in Putty.
Body
Follow rounds 1-15 of the original pattern, using grass. Change to walnut tweed yarn, fastening off the grass yarn.
R16+17: Sc 42.
Change to putty yarn,
R18: In BLO, Sc 42. (Mark the last FLO with a stitch marker- we’ll use this later when making the rim. It will be in the walnut tweed color)
Follow rounds 19-24 of the original pattern to complete the body.
Add safety eyes between rounds 11&12, 6 stitches apart. Sew on nose with Soft Rose yarn.


To make the rim-
R18A- With putty yarn, make a slip knot on your hook. With the body held upright, insert your hook into the last FLO of R18, yarn over and make your first single crochet. Then in the remaining FLO of R18, sc around. (42 sts)


R18B- Ch 1, then in the BLO, Hdc around. (42 sts)
Make a clean fasten off (see pattern notes) to make the rim even and clean. If there is a little gap in between, simply use the tail to sew it closed. Weave in all ends.


Arms
Using grass yarn,
R1: 5 sc in magic ring. (5 sts)
R2: Inc in each st around. (10 sts)
R3-10: Sc 10.
Fasten off and leave a tail for sewing. Add fiberfill to the arms, making sure to not overstuff.
Sew the arms to the body between rounds 12-14. To bend the arms, near rounds 5&6, pinch the arms up and the bend will stay in place. I didn’t have to use wire or sew them to stay in this position. If you don’t overstuff, they’ll be able to hold the bend shape.


Assemble the ears and legs exactly as the pattern states. Sew the tail to the body between rounds 18-22, right under the rim.
Flower
Use whichever color you’d like for the flower!
Using sunny day yarn,
R1: 7 sc in magic ring. On the last sc, change to flower color. (7 sts)


Prefer an ad-free, printable PDF pattern?
Grab the Seasonal Bundle of Chubby Bunny Crochet Patterns HERE
R2: *Sc 1, ch 4, then starting in the 2nd ch from hook, sc across (3 sc total), then sl st into the first sc (the one made before making the 4 chs) to complete the petal.* Repeat 6 times.
Fasten off and weave in all the ends.


Using hot glue, glue the center of the flower to the body, near one of the ears. Alternatively, you can sew the flower into place using a yellow yarn tail.


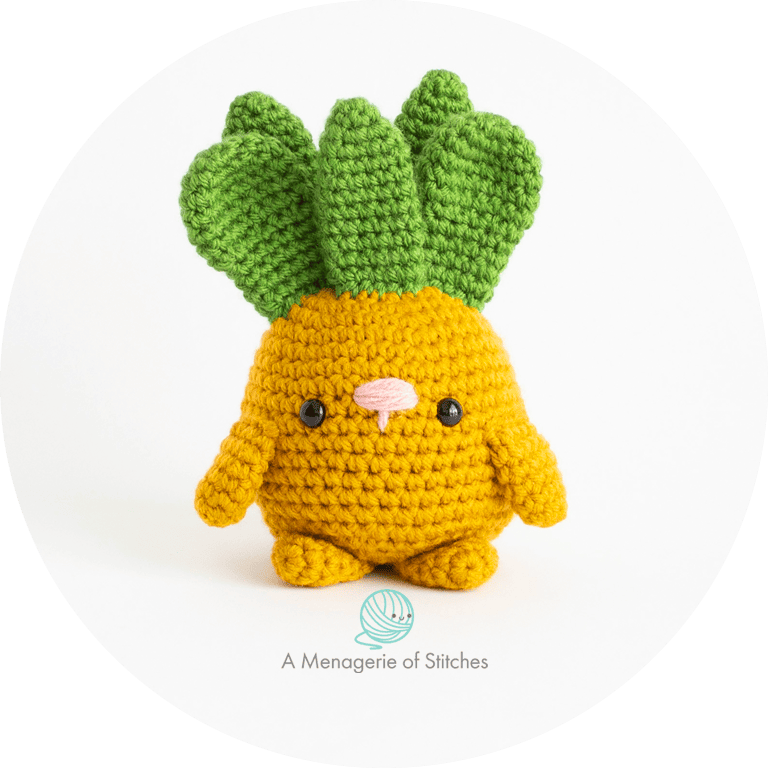
Pineapple Bunny
Materials Needed:
- Yarn- I used Michaels Loops & Threads Impeccable in the colors Gold and Soft Rose, Lion Brand Vanna’s Choice in the color Kelly Green
- Size E/3.5mm Crochet Hook
- 1 pair of black 9mm safety eyes
- Plus all other materials listed in the original pattern
Follow the entire pattern exactly as stated, making the body, arms, legs, and tail in Gold. Make the ears in Kelly Green. The only modification was the placement of the eyes. I positioned mine between rounds 11&12, 6 stitches apart.
Assemble the ears, arms, legs, and tail exactly as the pattern states.

Leaves
Use kelly green yarn for all leaves.
Small- Make 1
R1: 6 sc in magic ring. (6 sts)
R2: Sc 6.
R3: Inc in each st around. (12 sts)
R4-12: Sc 12.
Fasten off and leave a tail for sewing. Leave unstuffed.
Using straight pins, pin the leaf in front and in the middle of the two ears, between rounds 2-4. Sew into place and secure with a knot, hiding the end inside the body.


Large- Make 2
R1: 6 sc in magic ring. (6 sts)
R2: Sc 6.
R3: Inc in each st around. (12 sts)
R4-14: Sc 12.
Fasten off and leave a tail for sewing. Leave unstuffed.
Using straight pins, pin the leaves behind the ears, between rounds 3-5. Sew into place and secure with a knot, hiding the end inside the body.


Prefer an ad-free, printable PDF pattern?
Grab the Seasonal Bundle of Chubby Bunny Crochet Patterns HERE
Medium- Make 1
R1: 6 sc in magic ring. (6 sts)
R2: Sc 6.
R3: Inc in each st around. (12 sts)
R4-13: Sc 12.
Fasten off and leave a tail for sewing. Leave unstuffed.
Using straight pins, pin the leaf behind and in the middle of the two large leaves, between rounds 5-7. Sew into place and secure with a knot, hiding the end inside the body.


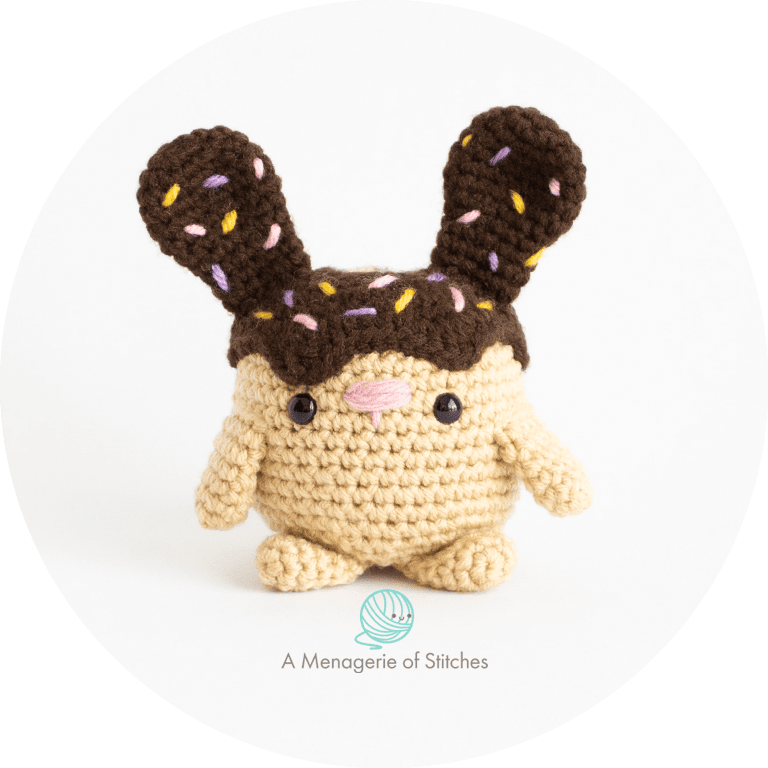
Donut Bunny
Materials Needed:
- Yarn- I used Michaels Loops & Threads Impeccable in the colors Chocolate and Soft Rose, Michaels Craft Smart yarn in the color Taupe.
- For the sprinkles, use scrap yarn! I used Michaels Loops & Threads Impeccable in the color Lavender, Hobby Lobby I Love This Yarn in the color Pink, Lion Brand Vanna’s Choice in the color Mustard
- Size E/3.5mm Crochet Hook
- 1 pair of black 9mm safety eyes
- Plus all other materials listed in the original pattern
Follow the entire pattern exactly as stated, making the body, arms, legs, and tail in Taupe. Make the ears in Chocolate, making sure to add sprinkles to the ears as well.
Frosting
Using chocolate yarn,
R1: Leave a long tail at the beginning for sewing later. Ch 18, then join with a sc into the 1st ch, going under both loops, leaving the back bump. Make sure the chain piece is not twisted before creating this circle. Then, sc into each ch, again going under both loops, leaving the back bump. (18 sts)


R2: Sc 1, *Sc 2, inc* 5 times, sc 1. (24 sts)
R3: *Sc 3, inc* 6 times. (30 sts)
R4: Sc 2, *Sc 4, inc* 5 times, sc 2. (36 sts)
R5: *Sc 5, inc* 6 times. (42 sts)
R6: Sc 3, *hdc dc, 2 tr, dc hdc, sc 5, hdc dc, dc hdc, sc 5* 2 times,
hdc dc, dc hdc, 2 tr, dc hdc, sc 4, hdc dc, dc hdc. (57 sts)
Fasten off, leaving an extra long tail for sewing.
Add sprinkles to the frosting piece.


Body
Work the pattern exactly as stated, making it in taupe yarn. Once you reach R15, pause and attach the frosting.
For the eyes, add them between rounds 11&12, 6 stitches apart.
Position the frosting so that two of the drips are positioned over the eyes. I was able to place a large drip over the right eye and a smaller drip over the left eye. This gave me space to sew on the nose later.
With the tail left over at the beginning of the frosting piece, use this to sew the frosting to the body. With the yarn needle, weave into the body. Then, when coming back out, weave under the back bump that was leftover from R1 of the frosting. We’ll use these back bumps all the way around to attach the frosting in place. Continue weaving the needle as such until you reach the end. Secure with a knot and trim the end.


Prefer an ad-free, printable PDF pattern?
Grab the Seasonal Bundle of Chubby Bunny Crochet Patterns HERE
Now with the extra long tail left when fastening off, use this to sew the rest of the frosting to the body. Weave the yarn needle into the body, then when coming back out, weave under the “V” from the stitches of R6. Go over to the next “V” and weave back into the body. When coming out to the front again, weave under the next stitch on the frosting. Move over to the previous “V and insert the needle back into the body. We’ll be creating a backstitch along the edge of the frosting for a clean finish. Secure the tail with a knot and trim the end.
Continue following the rest of the pattern to complete the body.


Make the ears and add sprinkles. When attaching the ears to the body, I found it easier to sew through the frosting layer only.


Assemble the arms, legs, and tail exactly as the pattern states.


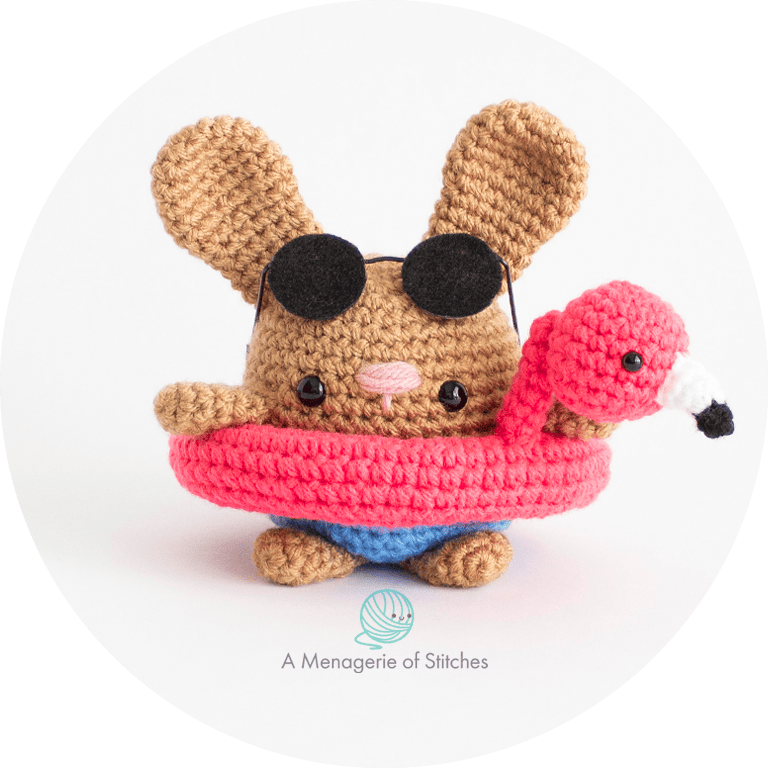
Beach Bunny
Materials Needed
- Yarn- I used Michaels Loops & Threads Impeccable in the colors Arbor Rose, Clear Blue, White, Black, and Soft Rose, Hobby Lobby I Love This Yarn in the color Toasted Almond.
- Size E/3.5mm Crochet Hook
- 1 pair of black 9mm safety eyes
- 1 pair of black 6mm safety eyes
- Plus all other materials listed in the original pattern
- Optional- Black Wire Doll Glasses (Mine are from Hobbii and are size 67mm. Find them here-https://hobbii.com/diy-glasses-gold?option=15834)
- Black Felt
- Hot glue gun
Ears, Arms, Legs, and Tail- Follow the pattern and make pieces in Toasted Almond.
Body
Follow rounds 1-15 of the original pattern, using toasted almond yarn. Change to clear blue yarn after completing round 15, fasten off the toasted almond yarn, and follow rounds 16-24 of the original pattern to complete the body.


Add safety eyes between rounds 11&12, 6 stitches apart.
Assemble the ears, arms, legs and tail exactly as the pattern states.
Flamingo Floaty
Floaty
Using arbor rose yarn,
R1: Ch 54, then join with a sc into the 1st ch, going under both loops, leaving the back bump. Make sure the chain piece is not twisted before creating this circle. Then, sc into each ch, again going under both loops, leaving the back bump. (54 sts)
R2: *Sc 8, inc* 6 times. (60 sts)
R3-8: Sc 60.
R9: *Sc 8, inv dec* 6 times. (54 sts)
Fasten off and leave an extra long tail for sewing.


To sew the floaty, flatten the piece so that both edges are together. With the yarn needle, weave the needle back and forth, going under the stitch (the “V”) from R9 and the back bumps from R1. As you sew the piece closed, add fiberfill, making sure to not overstuff. Once you reach the end, secure with a knot and hide inside the floaty.


Prefer an ad-free, printable PDF pattern?
Grab the Seasonal Bundle of Chubby Bunny Crochet Patterns HERE
Flamingo Head
Using arbor rose yarn,
R1: 5 sc in magic ring. (5 sts)
R2: Inc in each st around. (10 sts)
R3: *Sc 1, inc* 5 times. (15 sts)
R4: *Sc 2, inc* 5 times. (20 sts)
R5-8: Sc 20.
Add 6mm safety eyes between rounds 6&7, placing them 5 stitches apart.
R9: *Sc 2, inv dec* 5 times. (15 sts)
R10: *Sc 1, inv dec* 5 times. (10 sts)
R11: Inv dec around 5 times. (5 sts)Fasten off and leave a tail to close the piece. Use this same tail to sew the head to the next later.


Nose
Using black yarn,
R1: 4 sc in magic ring. (4 sts)
R2: Sc 4.
Change to white yarn,
R3: Inc in each st around. (8 sts)
R4+5: Sc 8.
Fasten off and leave a tail for sewing. Leave nose unstuffed.
With the yarn needle, sew the nose to the head, placing it centered between the eyes. Secure with a knot and hide inside the head.


Neck
Using arbor rose yarn,
R1: 6 sc in magic ring. (6 sts)
R2-7: Sc 6.
Fasten off and leave a tail for sewing. Leave the neck unstuffed. You won’t need stuffing or wire to keep it upright.


With the yarn needle, sew the top of the neck (where the magic ring is) to the head. Use the tail we left on the head to sew this into place. Secure with a knot and hide inside the head.
Then, with the tail left when fastening off the neck, use this to sew the neck to the floaty. Position the neck on top of the floaty. Secure with a knot and hide inside the floaty.
To place the floaty onto the bunny, go over the legs first, then pull over the tail.


Prefer an ad-free, printable PDF pattern?
Grab the Seasonal Bundle of Chubby Bunny Crochet Patterns HERE
Optional- Sunglasses
Using black felt, cut out two circles the same size as the outer edge of the glasses. Using hot glue, go around the outside rim of the glasses, then press the felt into place.
These sunglasses are totally optional but definitely make for an adorable summertime bunny!


➤Make sure to check out all of my other free crochet patterns here!
CLICK TO PIN NOW:
CROCHET SUMMER BUNNIES!
I hope you enjoyed and loved making these crochet summer bunnies! I’m thrilled to offer these free crochet patterns and love seeing all the things you make from my patterns. If you make these crochet summer bunnies, please tag me in your posts on Instagram @amenagerieofstitches and use the hashtag #amenagerieofstitches
Happy Crocheting!
Lauren
If you have any trouble with these crochet summer bunnies, please don’t hesitate to reach out! If you would like to make even more free amigurumi crochet cuties check others out here!
These crochet summer Chubby Bunnies are original patterns by Lauren Espy of A Menagerie of Stitches. Please do not claim this amigurumi pattern as your own. If you’d like to share this crochet pattern, you may provide a link to this post but please do not reprint it on your website. You may sell products made from this crochet summer bunnies pattern but please credit me, Lauren Espy of A Menagerie of Stitches, and provide a link to my blog www.amenagerieofstitchesblog.com Absolutely no mass production or manufacturing of any kind is allowed. Thank you for understanding.
Disclaimer- This Crochet Summer Chubby Bunnies post contains affiliate links. By clicking these links, you help support me and my business at no cost to you.
Wow, I love your bunnies, thank you so much for sharing!
Thank you so much for the kind words!!! You are so welcome!!!